This module plays back audio files from an SD card.
Module power consumption: 25 mA
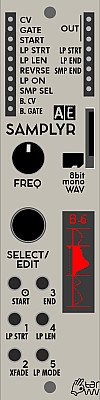
Inputs
- CV - Control Voltage for the pitch
- GATE - Gate control for the length of the sample playback when in loop mode, trigger when in one-shot mode. In loop mode the sample will only play while the gate is high.
- START - Voltage determining at which position the sample will start playing. 0V will play at the start and ~5V will be the end of the sample. If the sample is very long (SAMPLYR can play samples which are hours long) the accuracy of this will degrade.
- LP STRT - Voltage determining where the loop will start, independently from any per sample settings.
- LP LEN - Voltage determining the length of the loop, independently from any per sample settings.
- REVRSE - Gate control for playing the sample backwards. As long as the gate is high the sample will play in reverse.
- LP ON - Gate control for playing the looping part of the sample, independently from any per sample settings. As long as the Gate is high the loop will play.
- SMP SEL - Voltage to select a sample from the current folder, eg. if the currently playing sample is in folder D then this voltage will select any of the 10 samples in folder D.
Outputs (on the left)
- B. CV - MIDI pitch as transported through the bus.
- B. GATE - MIDI gate as transported through the bus.
Outputs (on the right)
- OUT - The audio of the sample playback
- LP STRT - A trigger signal when the loop starts (Please note: this mainly is intended to detect the very first loop-start, for continuous looping it will typically trigger at the same time as LP END)
- LP END - A trigger signal when the loop ends (this repeats for as long as the loop repeats)
- SMP END - A trigger when the sample playback ends
Controls
- FREQ Knob - Changes the pitch of the sample playback in addition to the CV control. Pitching of a sample is achieved by changing the sample playback speed, so the higher the pitch, the shorter the playback and vice versa for lower pitch.
- SELECT/EDIT Knob/Button - Multi function select knob and push button. When in playback mode, turning the knob will select the next/previous sample. Pushing the button opens a menu on the display (more info below).
- 0 / START - When in playback mode this button will select any sample which was assigned to this bank of presets (Within a range of names from '0' to '5'). In edit mode this is a shortcut to change the sample playback starting position.
- 1 / LP STRT - In playback as above. In edit mode shortcut to loop starting position.
- 2 / XFADE - As above. In edit mode shortcut to the cross fade menu
- 3 / END - As above. In edit mode shortcut to change the sample playback end position.
- 4 / LP LEN - As above. In edit mode shortcut to change the loop length
- 5 / LP MODE - As above. In edit mode shortcut to change the looping mode (loop or one-shot)
Display
The display shows the folder and file number of the currently selected sample at the top. Below it shows the waveform of the sample (amplitude over time) rotated 270 degrees into vertical and the following markers:
- Sample start - this is marked as the beginning of the filled waveform
- Loop start - this is marked as a horizontal line to the left of the loop range
- Loop end - this is marked by a horizontal line at the end of a dotted vertical line which marks the extent of the loop
- Depending on the loop mode, a triangle at the beginning/end of the loop range indicates the playback direction.
- Sample End - this is the bottom of the fille waveform
When in Edit mode, the display can also display information about the currently selected sample, such as filename, size, length and other info. It will also show the parameter which is currently editable, eg.
- sample start
- sample end
- loop start
- loop end
- cross fade (xfade)
- loop mode
Edit Mode
To enter the edit mode, click the encoder; then, the program number is replaced with the menu options. Turning the encoder scrolls through the menu options; a further click selects the editing of the according value, like start/endpoints, loop points etc. Turning the encoder changes the value, another click on the encoder returns to menu selection. The leftmost menu option is "Save"; clicking here stores the defined settings. The menu item WAVEFRM rebuilds the waveform graphics; this is useful when the actual WAV file on the card has been replaced. (The graphics is only generated once and stored then.) The menu item WAV INFO shows the full filename and other file related info.
Global settings
In the menu, the rightmost menu items are stored globally:
- CV tracking calibration
- Hot change mode - When ON then on a sample change the playback will start roughly where the other sample was when the change was initiated, or if this doesn't work at the loop start. This makes the module behave like a radio when scanning through the stations.
Micro SD Slot
You can insert any Micro SD card which is formatted with FAT32.
In principle the following cards could be supported:
- SD: Up to 2 GB
- SDHC: over 2 GB to 32 GB
- SDXC: over 32 GB to 2 TB
FAT32 only supports a maximum partition size of up to 2TB and individual file size of up to 4GB.
This gives us the following maximum length of an individual sample (WAV 8bit uncompressed, mu-law or alpha-law):
- 4GB/32khz: 34 Hours : 43 Minutes : 20 Seconds
- 4GB/16khz: 69 Hours : 26 Minutes : 40 Seconds
HOWEVER: When loading a sample for the first time its waveform is calculating for the display and then stored along with the sample. As this is a very tiny processor it can take a long time for very long samples ... maybe even hours!
SD Card file fragmentation - SAMPLYR plays samples directly from the SD card and expects all files in byte order. If you encounter issues with playback this could be the result of a fragmented file system. It would be best if you copied all files from the SD card to your computer and then format the SD card (not quick formatting) and then transfer the files back onto the card. This will ensure that the files are stored in order and can be read from the SAMPLYR software.
How to organize Samples on the SD Card
To keep things simple, the files on the SD card are organized in a fixed structure:
- The card can contain in its root a number of folders, named with exactly one letter, from "A" to "Z"
- The files are named beginning with a number from "0" to "9"; the full filename can be longer and be descriptive, but the SAMPLYR only checks for the first letter. Only 10 files per folder are allowed.
- The extension is always ".WAV".
How to prepare Samples
The samples must be WAV files, with a resolution of 8 bits and mono. The encoding can be either PCM (simple, straight 8bit audio), or being encoded as uLaw or aLaw. These are encodings that allow a little higher bit depth, in case of the SAMPLYR this is 10 bits effectively.
The preparing/converting of samples for he SAMPLYR can be done e.g. with the open-source audio editor software Audacity (see https://www.audacityteam.org/ ).
The basic steps for converting an existing sample for SAMPLYR are the following:
- Open the audio file in Audacity
- In case it's a stereo sample: Click menu Tracks > Mix > Mix Stereo Down to mono...
- Amplify the sample to use the full volume resolution (bit-depth): Click Effect > Volume and Compression > Amplify... , then New Peak Amplitude (db) to "0" (Make sure to select the complete sample for this operation, typically by clicking on it and applying CTRL-a / CMD-a)
- First of all make sure to set the "Project Rate (Hz)" at the left bottom corner to your preferred Samplerate, up to 32000
- Set the sample rate for export: Go to menu Edit > Preferences, Audio settings, (or Tracks > Samplerate in some versions of Audacity) set "Default Sample Rate" to the identical rate as the Project Rate.
- Click File > Export > Export as WAV... and set encoding to Unsigned 8-bit PCM, or U-Law or A-Law
- ... DONE!
Samplerates of 16000, 22050 or 32000 are recommended (and are usually stored for future sessions). Please note: when 32khz is used you get the best results, but you then can pitch the sample only about one note upwards, so in that case please make sure your material is optimized to be played with lower notes/CVs from 0 to (slightly above) 4V (given that the source-material is tuned/should be set to C). As explained above, the relative adjustment in terms of which note/CV will result in what playback speed/frequency for this can be done with the FREQ Knob.
Especially when using samples with low volumes / higher dynamic-ranges the usage of U-Law (or A-Law) is recommended, U-Law typically also was used with vintage samplers from the early 80th. U-Law has a higher dynamic range (14 bit), but more distortion with low volumes than A-Law (12 bit). Because of the 10bit DAC of SAMPLYR, thus you may find A-Law preferrable. Experimentation may be needed to find the best possible results! Also compression/limiting of the material prior to exporting for a specific format can increase the quality. Of course, you can apply all the processing methods Audacity offers (which is quite a lot!); check the documentation for this. In any case, it's recommended to do all processing on a file with the highest resolution and sample rate, and reduce it to the 8-bit WAV only as the last step.
Patch Suggestions
This video shows some demo sounds and rough overview of the module's features: